Project Overview
The Smart Environment Toolkit is an extension of the Smart Lab project, taking the concept of a smart IoT lab with microbits and expanding it to a comprehensive environment spanning multiple buildings and rooms, all configurable by the user. It provides a web interface accessible from anywhere, offering real-time statistics for buildings and rooms (e.g., the number of people, temperature, noise level, and light level). Users can also remotely control room lighting. Microbits are used to record data and communicate within a mesh network. The collected data is processed and stored in InfluxDB, and the website retrieves information from an API written in Python.
This project was completed in a group of 3 people, with my primary role encompassing mainly backend but I did also make the graphing webpage and in my previous project, Smart Lab I extensively worked with microbits however there wasn’t a need for that this time. So My focus for this project was on the Base Station, API, InfluxDB, MySQL DB, Grafana and graphing page for the website.
Project Features
Real-time Environmental Data and Location Tracking
- Temperature, light, and noise levels are continuously recorded by microbit sensors.
- Users can track the number of people in each zone, area, and room in real time.
- Location tracking is facilitated by walkers carrying microbits, which periodically report their location to sensors.
Light Actuation
- Users can remotely control room lighting via the web interface.
Door Unlocking and Locking
- Microbits can be assigned the role of a door, allowing users to unlock and lock doors remotely.
Graphs of Live and Historic Data
- The system allows users to analyze historical environmental data through graphs and charts, providing insights into trends and patterns.
System Structure
- The system’s structure is highly flexible and user-configurable.
- Zones, areas, and microbits can be easily added, removed, or reconfigured via the web interface.
Role-Based Access Control and User Managment
- Two user levels exist: User and Admin. Admins can promote users, delete accounts, and configure the system.
- The system can enforce role-based access control, ensuring that users can only access features and data relevant to their assigned roles.
Structure of the system
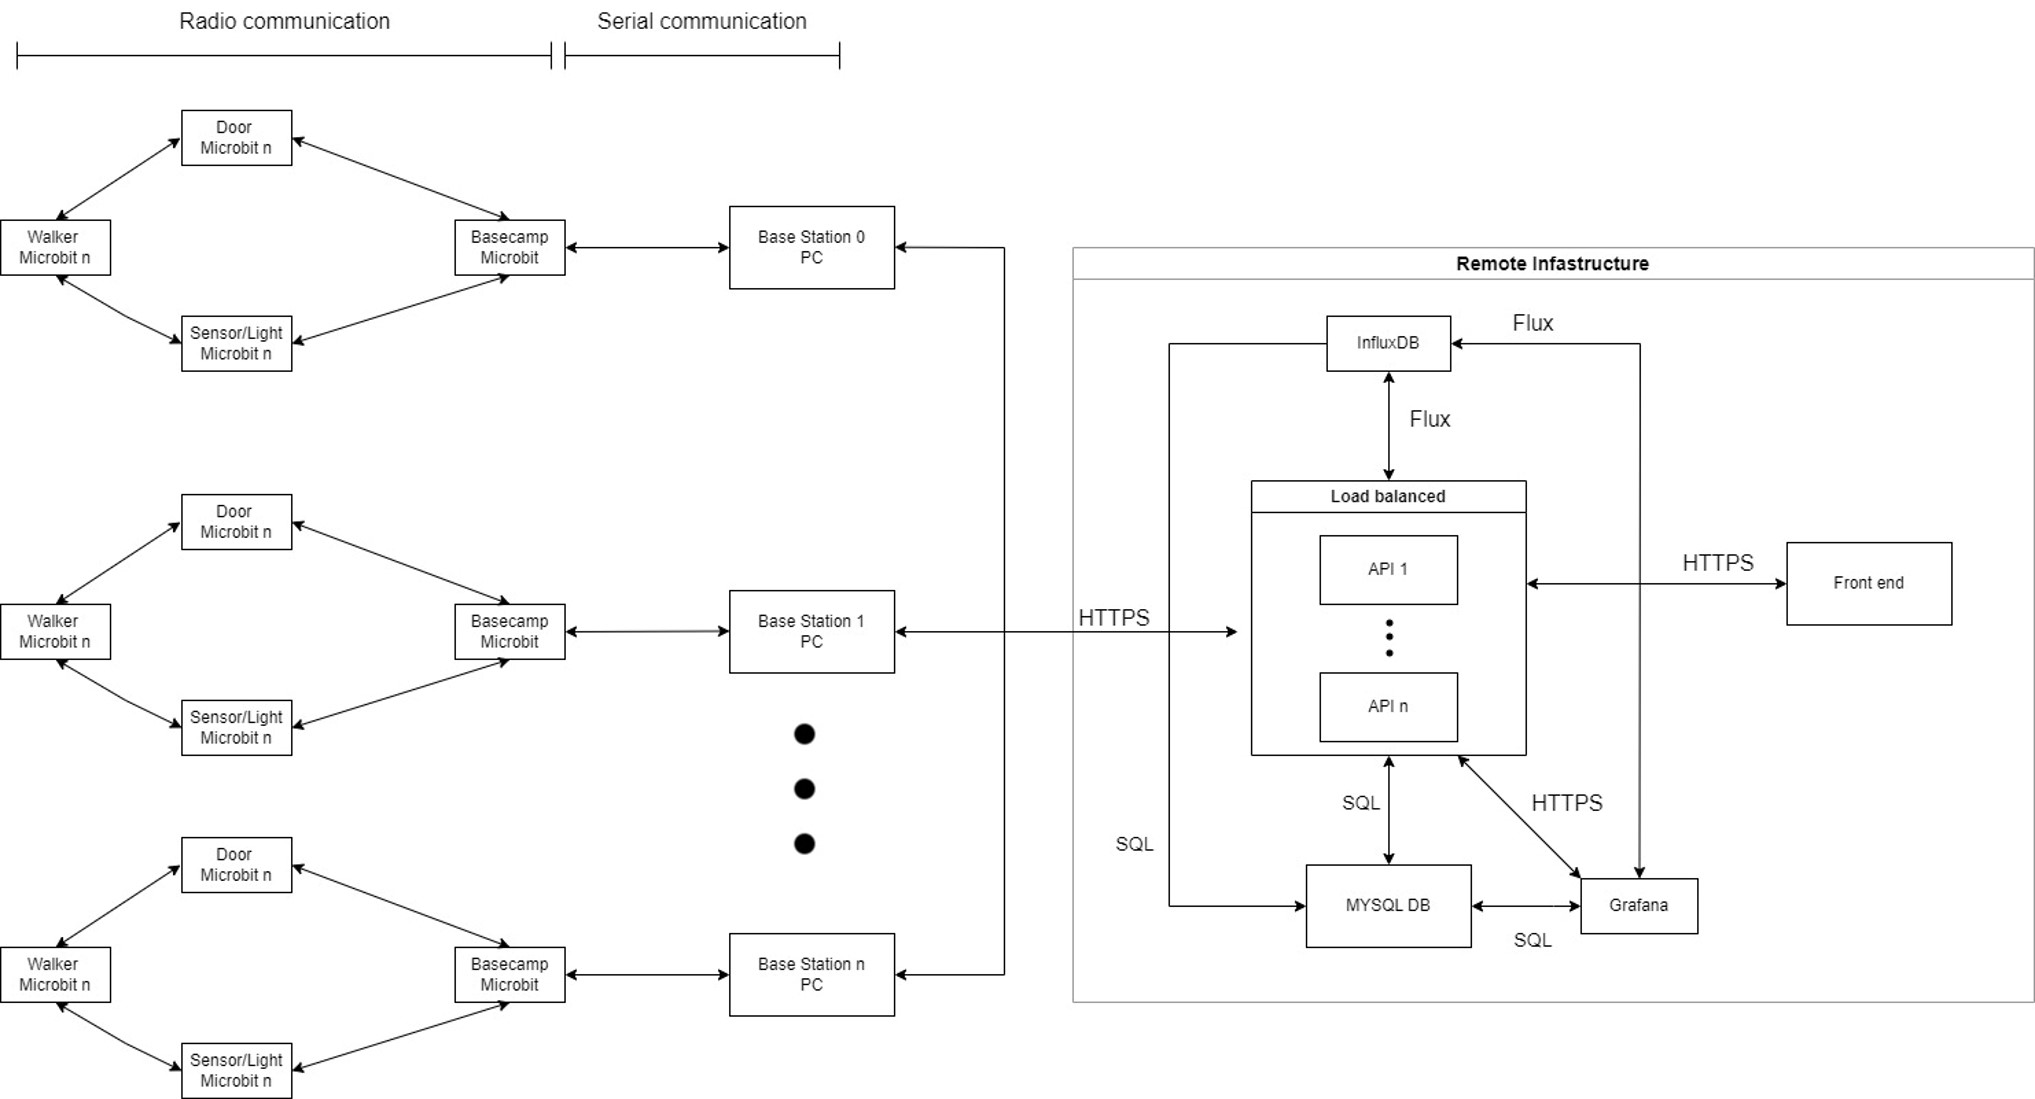
Architecture diagram of system
Architecture summary
- Microbits communicate via radio on specific bands and groups.
- Sensor microbits locate the nearest basecamp microbit, which transmits the data to the base station via serial communication.
- The base station, a continually running Java program on the PC, processes and filters the data, then sends it to the API through relevant routes.
- The REST API, written in Python, processes data points by sending them to InfluxDB using Flux statements, while data related to microbit roles is stored in MySQL DB.
- Grafana combines data from InfluxDB and MySQL using Flux statements, providing a more efficient solution than Grafana’s built-in functions.
- The API and website auto-deploy through a Docker container on the VPS, allowing easy updates with a simple click.
- The front-end website accesses various data and graphs through API routes, offering control over microbits and system configuration, including user management, role assignments, and structural changes.
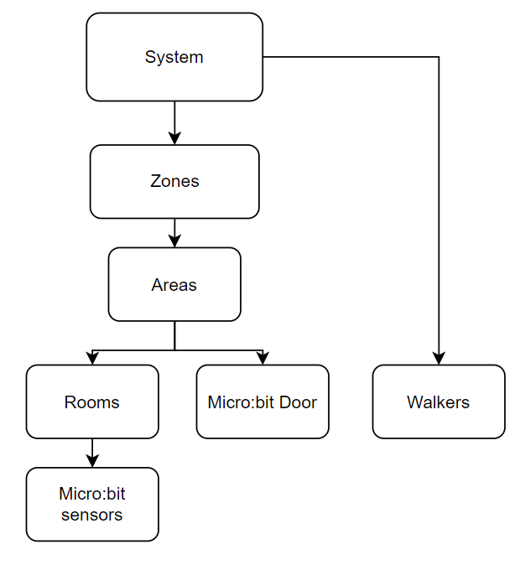
Logical structure diagram
Logical structure reasoning
- The system is highly adaptable, allowing users to define zones, the number of zones, and the number of areas within each zone.
- It accommodates an unlimited number of walkers, doors, and sensor microbits, with the only requirement being at least one basecamp in rooms with sensors.
- Rooms can exist without basecamps, and in some cases, without microbits, offering flexibility.
- All management functions, such as adding, deleting, and modifying rooms, areas, and zones, as well as assigning, unassigning, and changing microbit roles, are accessible from the user-friendly front end.
Microbits
The code for the microbits is written in C++ and uses the codal library. Microbits communicate with each other via radio, with sensors reporting data to a basecamp microbit, which then sends it to the Base Station on a PC.
Key features:
- Our setup has evolved since the previous project, eliminating the need for atomic multicast, resulting in improved efficiency with microbits.
- The walker microbit now serves as a door opener and a real-time location and room capacity tracker, no longer requiring direct communication with the basecamp.
- When a walker attempts to open a door, the door contacts the base camp, which relays the request to the base station via serial communication.
- The base station converts the door request into an API request to determine if the door can be opened, and the result is sent back to the door.
- Simultaneously, the walker microbit sends “alive” messages to the nearest sensor every 10 seconds, facilitating live tracking.
- Sensors also transmit temperature, noise, and light readings every 3 seconds.
- Upon powering on, microbits use a simple DHCP approach, requesting their ID and role from the basecamp.
- The basecamp queries a MySQL table containing microbit serial IDs, user-friendly IDs (starting at 1 and incrementing), and roles via an API request.
- Microbits flash their roles, and if no role is assigned, they send a keep-alive request every 30 seconds.
- Metadata is included in microbit transmissions, specifying the packet’s size, message ID, packet ID, microbit ID, and data.
- Message IDs ensure that messages are processed only once, as they are randomly generated 32-bit unsigned integers.
Base Station
The Base Station, written in Java, is responsible for processing data from microbits, filtering out junk messages, and forwarding the data to the API. It uses the observer design pattern to handle events.
Key features:
- The Base Station, written in Java, processes data from microbits, invoking relevant API routes for data handling and storage.
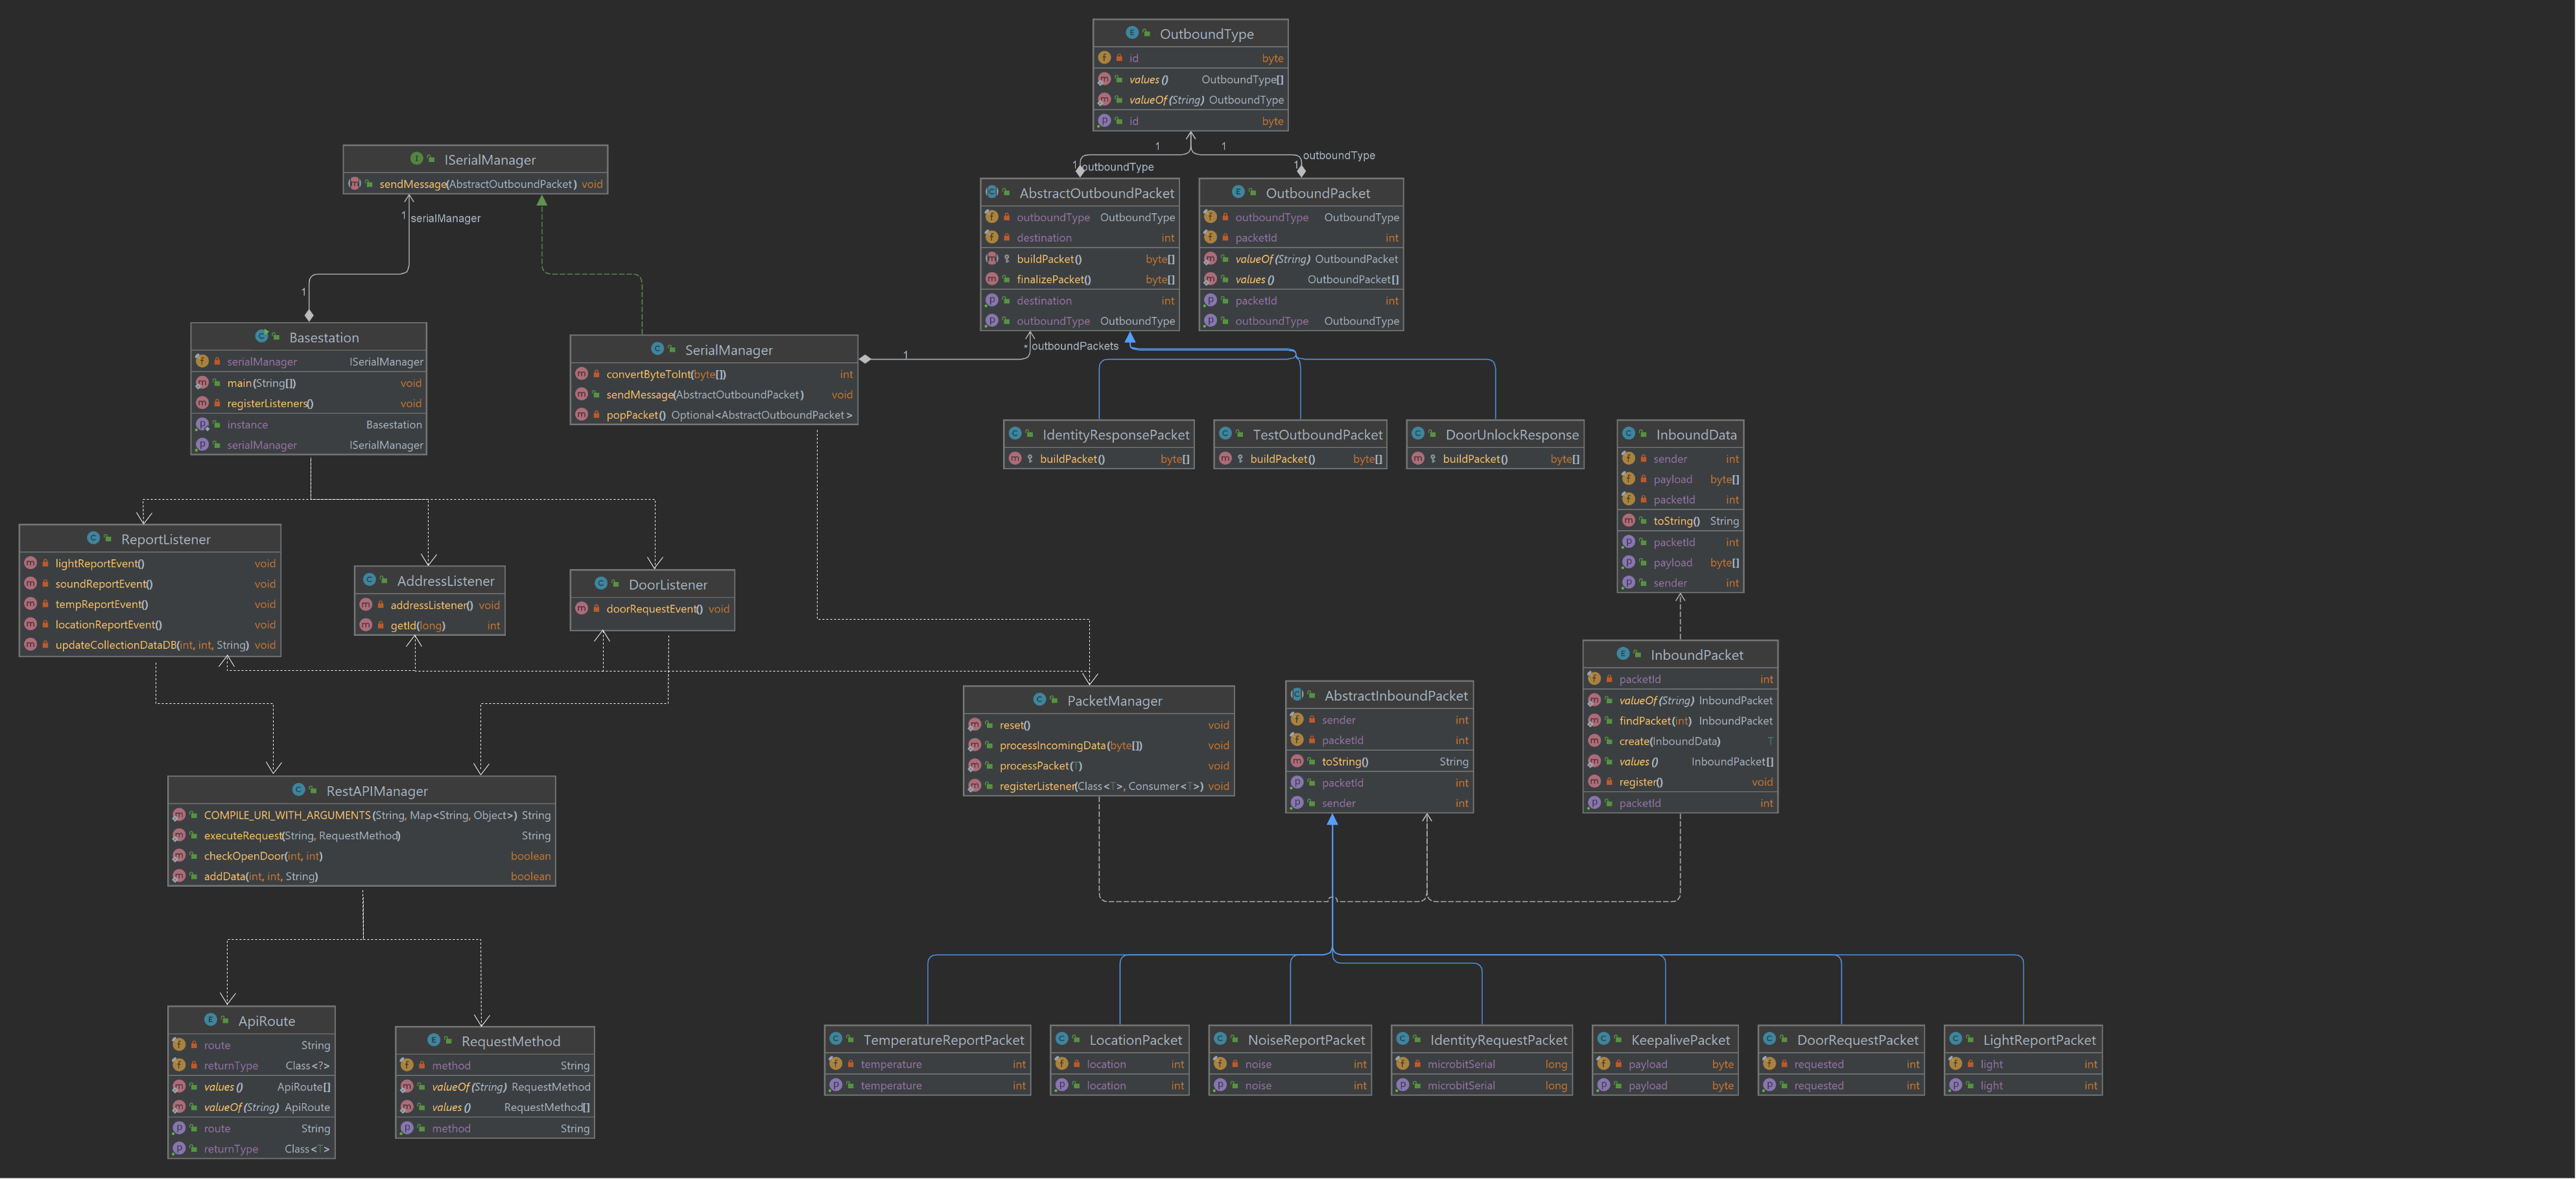
- It follows the observer design pattern, with a serial manager reading packets and reporting them to the packet manager.
- The packet manager notifies registered listeners about specific packet types, and listeners execute predefined actions accordingly.
- The report listener communicates with the REST API manager to store data, the door listener checks if a microbit can open a door, the address listener assigns microbit IDs, and the light actuation listener retrieves light status.
- Listeners that need to send packets do so via the serial manager, which writes them over serial.
- The Base Station includes checks to prevent data corruption, verifying packet size during processing and discarding incomplete or corrupted packets.
- Microbits also handle duplicate packets based on IDs to ensure data integrity.
- Unit tests using JUnit cover packet parsing and URL route creation.
- The Base Station offers a debug mode for diagnostics, providing insights into packet processing and route usage.
Base Station Class Diagram
I’ve created a class diagram for the Base Station instead of including code snippets, as code snippets alone might not provide sufficient context. The class diagram illustrates interactions between classes, with dotted lines indicating usage, blue lines representing class inheritance, green lines showing class implementation of interfaces, and white solid lines indicating class composition:
Database
The project employs two databases: InfluxDB for storing data points and MySQL for storing user details and system structure. InfluxDB is used for its efficient time-series data storage, while MySQL manages user accounts and logical structure.
API
The REST API, written in Python using Flask, has around 50 routes, allowing users to retrieve various data points, configure microbits, and manage the system. It interacts with InfluxDB and MySQL for data storage.
To get specific datat points it is in the influx databas so I just had a flux query to get the data for microbit ID x, however it did mean that I had to learn flux which was quite a task in comparision to sql as influx/flux returns multiple tables rather then just one nice combined table like SQL and below you can see an example of a flux statement.
Example of a flux statement and the code in python to get the last record from x microbit with x offset:
1
2
3
4
5
6
7
8
9
10
11
12
13
14
    #Gets the last record from the table given with the microbit and the offset of the result (i.e if you want the 2nd last result)
    queryResult = query_api.query('from(bucket: "scc331") '
        '|> range(start: 0) '
        '|> filter(fn: (r) => r["_measurement"] == "' + str(table) + 'Result") '
        '|> filter(fn: (r) => r["microbitID"] == "' + str(microbitID) + '")'
        '|> sort(columns: [\"_time\"], desc: true) '
        '|> limit(n:1, offset: ' + str(offset) + ')')
    records = []
    try:
        #Gets the time and microbit ID and value for the record from the flux result
        records.append([queryResult[0].get_time(), queryResult[0].values.get("microbitID"), queryResult[0].get_value()])
    except: #incase no results were found for the microbit ID
        records = []
    return records
For aggregated results, like counting people in a specific building, I retrieved microbit IDs for zones and areas from the MySQL table. Then, I obtained the latest locations of all microbits via InfluxDB and counted walkers in zones or areas. Connection to mysql is done through using the mysql connector library.
Example of code for changing a microbit’s role, in Python:
1
2
3
4
5
6
7
8
9
10
11
12
13
14
15
16
17
18
19
20
21
22
db = mysql.connector.pooling.MySQLConnectionPool(host=mysql_address, user=mysql_user, password=mysql_password, database="SCC331", autocommit=True, pool_reset_session=True, pool_size=5)
#creates and executes a prepared statement given the query and arguments and then returns the result
def execute(query, arguments=None):
    if arguments is None:
        arguments = []
    #opens the mysql connection
    con = db.get_connection()
    cursor = con.cursor()
    try: #tries to execute the query
        cursor.execute(query, arguments)
        res = cursor.fetchall()
        return res
    finally:  #ensures the mysql connection is closed and no memory leaks happen
        cursor.close()
        con.close()
#changes a microbits role given thier ID and the new desired role
def changeMicrobit(microbitID,type):
    try:
        execute("update microbit_dhcp set type = %s where microbit_address = %s;", (type, microbitID))
        return True
    except:
       return False
The API uses Flask sessions for authentication. To log in, a user must access a login route with a username and password. The password is hashed using bcrypt (for secure storage) and checked against the database hash. If the check succeeds, the route sends a cookie with the user’s authentication level for subsequent requests. Every route specifies a required authentication level. Attempting to bypass the login page results in a 404 error implemented as follows:
1
2
3
4
5
6
7
8
9
10
11
12
13
14
15
16
17
18
19
20
21
22
23
24
25
26
27
28
29
30
31
32
33
34
#Login route takes a username and password
@app.route('/login',methods=["GET"])
def logingRequest():
    user = request.args.get("user", type=str, default="user")
    password = request.args.get("password", type=str, default="password")
    sql = execute("SELECT password, `role` FROM users WHERE username = %s;", (user,))   #gets the users hashed password from the table
    try:
        password_hashed = sql[0][0]
        auth_level = roleFromString(sql[0][1])

        if bcrypt.checkpw(password.encode("utf-8"), password_hashed.encode("utf-8")):   #checks the users hashed password matches the password given once hashed
            session['logged_in'] = True
            session['auth_level'] = auth_level
            return jsonify({"success":True,"auth":auth_level})
        else:   #if the users password doesn't match then they arent authorised
            return jsonify({"success": False,"auth":0})
    except:
        return jsonify({"success": False,"auth":0})

#This function checks that the user for this session has logged in and has the valid auth level
def authenticated(requiredRole):
    def actual_decorator(function):
        @wraps(function)
        def authentication(*args, **kwargs):
            if session:
                if session['logged_in'] and session['auth_level'] >= int(requiredRole):
                    return function(*args, **kwargs)
            return "UNAUTHORISED", 401
        return authentication
    return actual_decorator

#every function/route has this attached which calls the authenticated function to check if they are authorised
@authenticated(Role.Admin)
def findAddress():
Regarding API testing, I performed unit tests using the unittest library to verify persistent login, route functionality, and data accuracy, in addition to integration and end-to-end testing.
Demo and Costs
Demo of overall system
Here is a video of the website working from a phone:
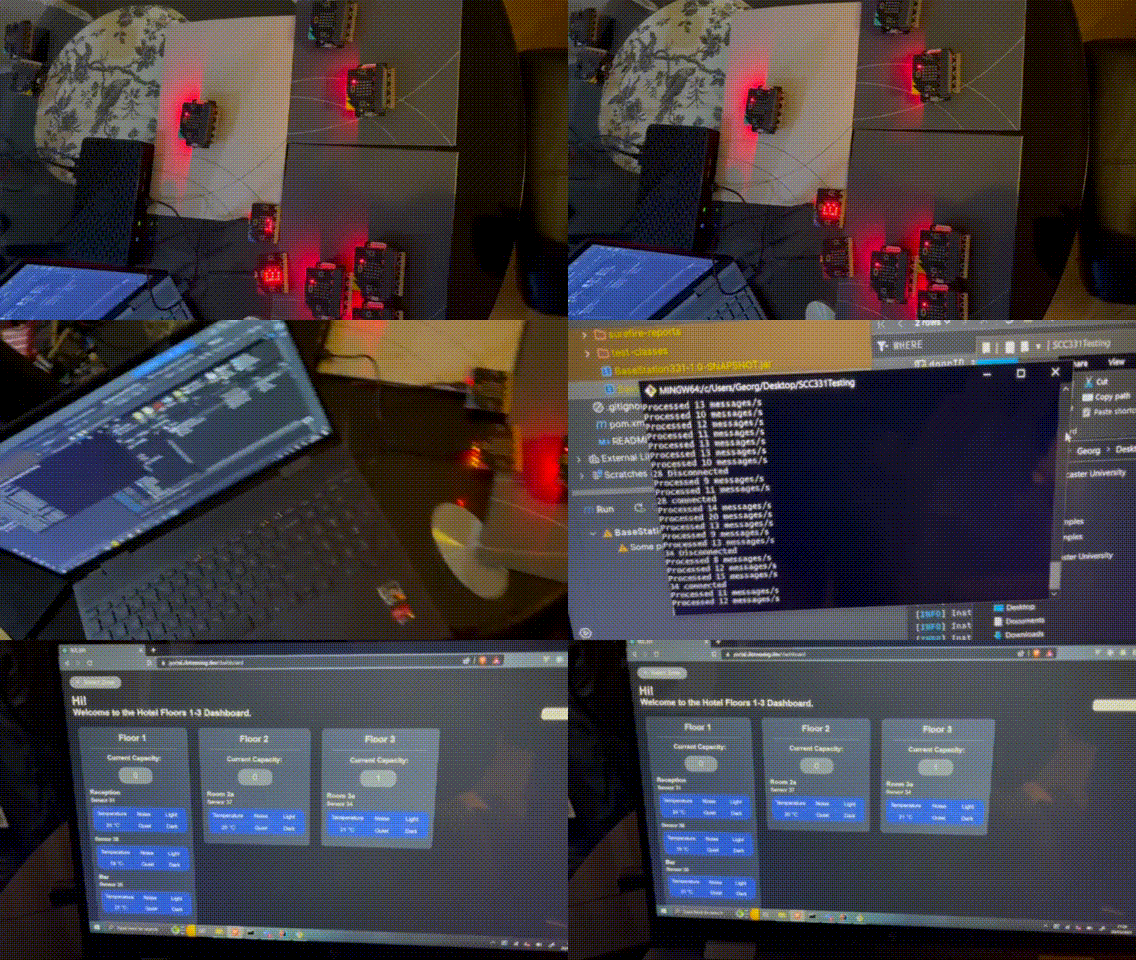
Demo of the hardware sides of things:
In the demo below, you can observe the system in action, with each cluster representing a room and its associated microbits (please note that it has been tested in larger environments beyond what’s shown). The computer, equipped with a base camp microbit, flashes “B” upon message processing. The computer’s console window displays logs from the basestation such as messages processed per second, microbits connecting and disconnecting, and any errors. Lastly, the computer showcases the homepage dashboard of the website, featuring live data.
Realtime environmental data (including location tracking)
Each microbit sensor records temperature, light, and noise levels. Temperature is in Celsius, while light and noise are on scales of 0 to 255 and readings in the 9000s, respectively. We converted these values into ‘quiet’ for noise levels below a certain value and ‘dark’ for low light levels. This data is displayed on the website’s homepage, categorized by zone, area, and room.
The system also tracks each zone’s capacity, representing the number of people with microbits in it. Walkers send signals to nearby sensors to determine their location, reported every 10 seconds and stored. The API retrieves capacity data from the last 5 minutes for accuracy and ensures no duplicate counts of walkers based on unique IDs and the last recorded location.
Here you can see a video of the location tracking working looking on the left screen you will see the current capacity numbers change within 10 seconds of the microbit walker being moved and you can also see the live temp,noise and light level:
Light actuation
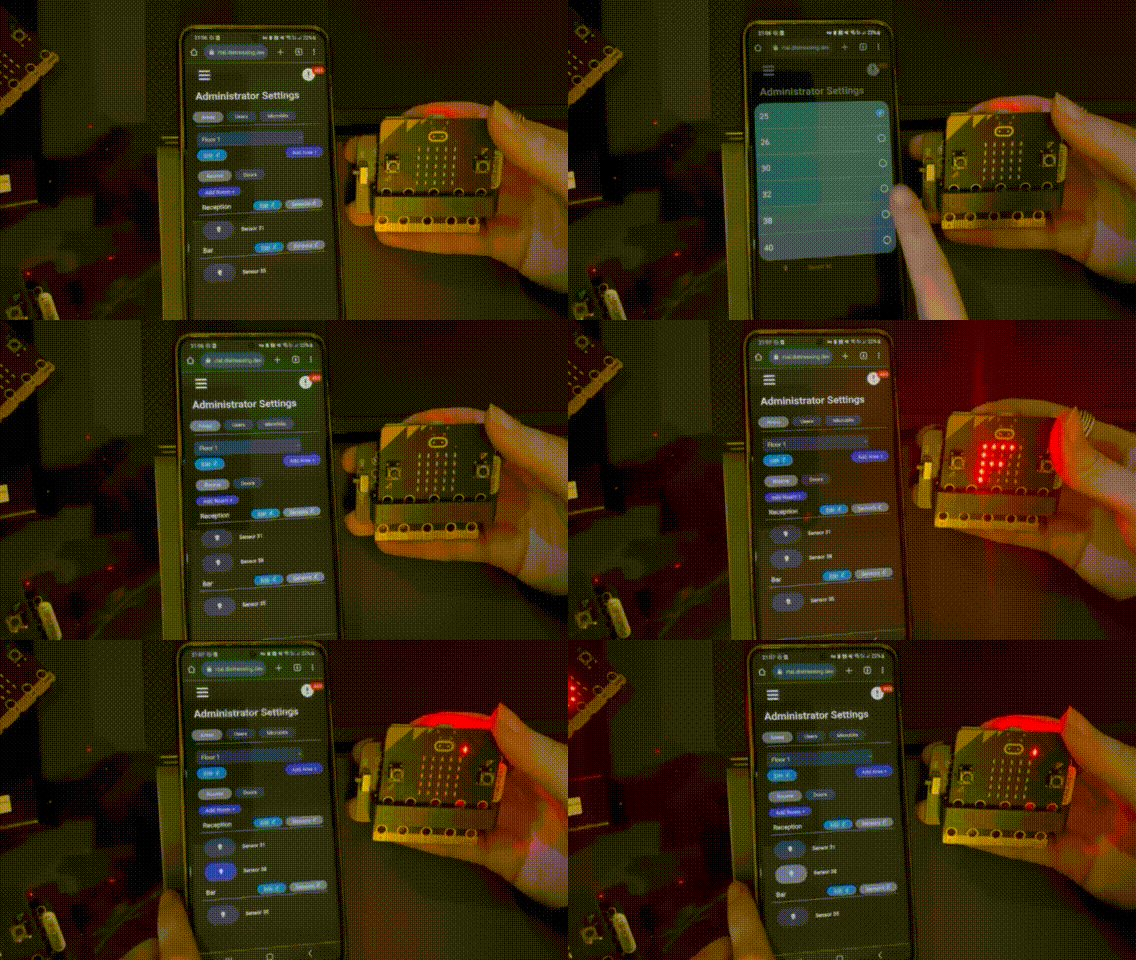
Here is a video of the a microbit being made a sensor via the website and then on the website turning that sensors light on:
Door unlocking and locking
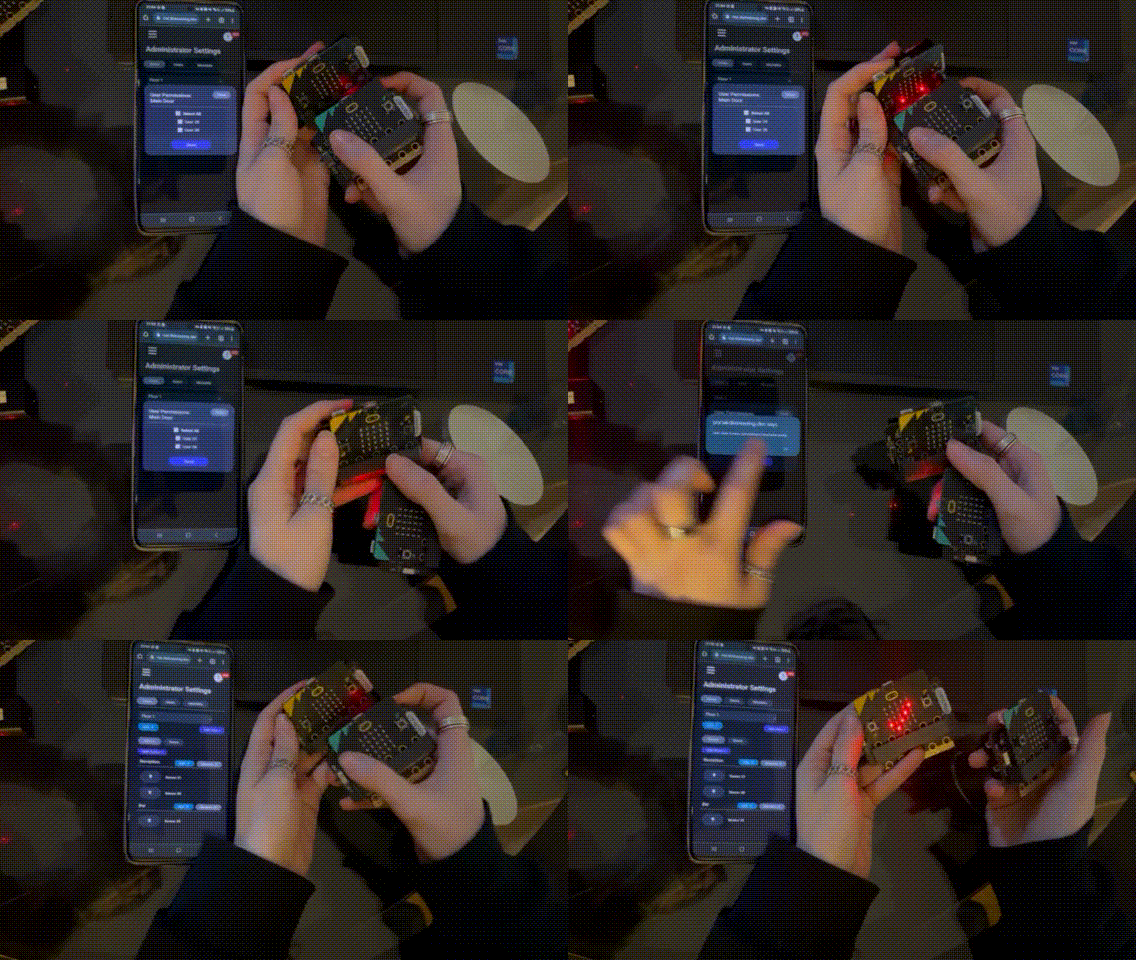
Here is a video of the a walker trying to open a door they dont have permission to, then giving them permission and them opening the door:
Graphs of live and historic data
Here is a short video showing the graphs with live and historic data:
System structure and user management
As seen in the previous screenshots, GIFs, and videos, you can fully manage the system from the front end. This includes creating new zones, which are clusters of user-defined areas (such as floors or buildings). You can also easily manage all the microbits within these zones. Notably, the system is highly customizable and adaptable to various scenarios, as demonstrated by successfully transitioning from a smart campus to a smart hotel without any code changes.
The system supports two user levels: user and admin. Users can create accounts, while admins have additional privileges like promoting users, deleting accounts, and configuring the system.
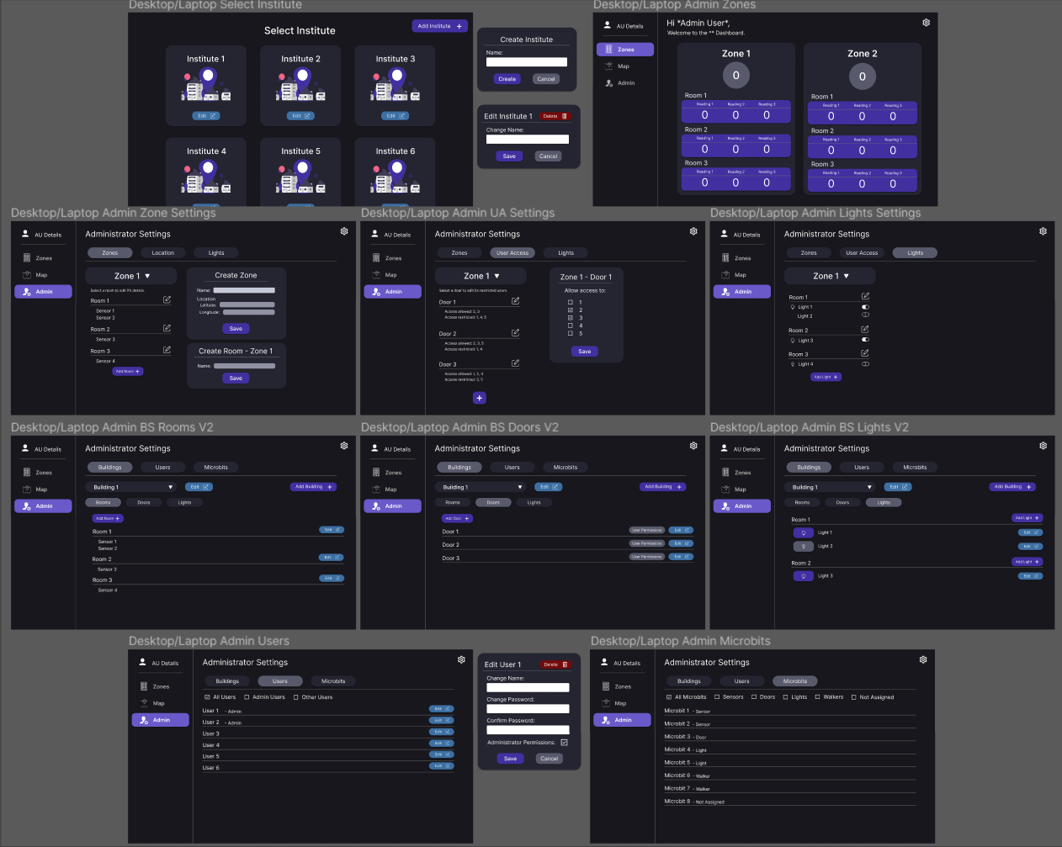
Below are design mockups of the system, showcasing its evolution through various iterations based on user testing and feedback.
Costings of the system
Here’s an estimate of the costs associated with different system sizes:
- Small System: £447 initial hardware cost + £120 VPS upkeep per year
- Medium System: £1,508 initial hardware cost + £240 VPS upkeep per year
- Large System: £3,516 initial hardware cost + £600 VPS upkeep per year
- Custom System: Variable cost based on the number of microbits
Please note that these costs do not include electricity expenses.
Comments powered by Disqus.